Install
How to install and configure the collector and its pre-requisites.
Prepare: XIQ-SE API Account
The collector will retrieve all managed
switches and
their read-only credentials from your
XIQ-SE (aka
XMC). To query them, you will need to
create an API
account to be used by the collector.
Navigate to
Administration-->Users
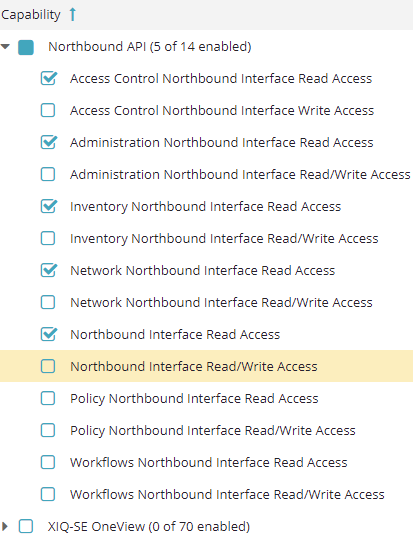
Add a new Authoriation Group at
the bottom
of the screen. To configure the minimal
access
rights required, follow this example.
Then use the top navigation to go to
Client API Access and add
a new API Client. Make sure to choose the
Authorization Group created in the previous
step.
Note down the Client ID and Client
Secret!
Prepare: XCC / WING API Account
For the collector to be able to retrieve data from
your Wifi controllers it requires a user/API
account with read-only authorization. Create those
credentials and have them ready for the config
steps lateron.
For XCC controllers: got to the account management
page, choose an admin account (or reate a new one)
and click on "Generate new API
Key". This will
download a JSON file which contains a "key"
(=username) and "secret" (=password).
For WING controllers: make sure to create a
full Admin account as the "REST-API"
account doesn't give us access to the NOVA API!
Prepare: WING "Nova" API
The collector uses some of the newer API end-points
provided by the "Nova" API. Make sure to enable
Nova service in your controller's config. Example
ouptput once Nova is enabled:
VX9000-1(config-management-policy-default)*#show
context
management-policy default
no telnet
no http server
nova
https server
rest-server
ssh
Import OVA
The collector is provided as a single VMWare OVA
file. Download the file as provided to you by your
Extreme Networks representative and import it into
your VMWare environment.
The OVA requires only a single networks interface.
Make sure the connected virtual network allows the
collector to communicate with your switches, Wifi
controllers and XIQ SiteEngine.
The OVA is configured to request an IP via DHCP so
once it booted up you can connect to the VMWare
WebConsole to see the IP it received.
Configure Networking
Use your browser to navigate to the Webmin
interface. Example:
https://10.8.31.10:12321/
Login using the default account:
root/Extreme!
Navigate to Networking-->Network Configuration,
click on Network Interfaces and
click on eth0 to
configure the main interface.
Under IPv4 choose Static
configuration and configure a
static IP that you prefer.
Click the Save button
below. Do not apply this config change yet.
Go back to Network Configuration and click
on Routing and Gateways --> configure the
default gateway for eth0. Click the Save
button.
You can also configure your own DNS server by
clicking on Hostname and DNS Client.
Finally, click the Apply
Configuration button!
Login and modify the root password
Login to the collector VM using username
root and password
Extreme!.
First things first: change the root
password! Type: passwd
and provide a more
secure password for the root account.
Configure the Timezone
Check the current timezone
ls -l /etc/localtime
and
date
List all available timezones by browsing through
these folders
ls -l /usr/share/zoneinfo/
ls -l
/usr/share/zoneinfo/Europe/
Change the timezone to Berlin (for example)
ln -sf /usr/share/zoneinfo/Europe/Berlin
/etc/localtime
And reboot for the changes to take effect:
init 6
Configure the Time
Check the current time
date
If it is off from the real time, you can configure
it using the following format:
date
MMDDhhmmyyyy.ss
Example to set the time to 17:22:00 on June 14th
2022
date 061417222022.00
Configure Proxy (optional)
If you want to connect the VM to the internet (to download software updates) and this requires the use of an HTTP proxy then follow these instructions: Docker HTTP/HTTPS Proxy
Configure the Collector
The collector has all of its config files in
folder
/opt/energy-collector.
There are
two files to configure:
- Environment file: .env
- TZ Configure your timezone as a string here to tell the DB in which timezone it operates. To see a list of all supported timezones take a look at the file available_timezones
- COLLECTOR_CUSTOMER_ID Configure your company name here. Can be long or short form but should be unique (very short abbreviations might be used by multiple customers which will be an issue later on).
- COLLECTOR_COLLECTOR_ID This can be the name of the location where you installed this collector instance. Could also be something like headquarter. This can be used to distinguish data from two or more collector instances.
- XIQ_SE_* settings As a minimum, you will have to set this feature to "True" if you want to pull your device info from your XIQ-SE and configure the XIQ-SE IP, client_id and client_secret (API credentials create in an earlier step).
- Main config file: config.toml
- CustomerId Configure your company name here. Can be long or short form but should be unique (very short abbreviations might be used by multiple customers which will be an issue later on).
- CollectorId This can be the name of the location where you installed this collector instance. Could also be something like headquarter. This can be used to distinguish data from two or more collector instances.
- XiqSE settings As a minimum, you will have to set this feature to "True" if you want to pull your device info from your XIQ-SE and configure the XIQ-SE IP, ApiClientId and ApiClientSecret (API credentials create in an earlier step).
- XIQ Controllers If you want to pull data from your XIQ-Controllers you can configure one [[CollectorXiqC.Controllers]] section per controller. Make sure each section has a unique IP address and the credentials are correct.
The .env file is hidden but your can still see it using ls -la and edit it using nano .env. You must edit at least these config parameters:
Start the Collector
Since this is your first time starting
the collector and some backend services
will take a few seconds to properly
configure themselves, it is recommended to
start those backend services first using
this command:
docker compose up -d timescaledb
grafana loki mqtt
Wait a minute and then check whether those
backend services are still running (and not
restarting):
docker ps
To start the rest of the app including all data
collectors run
docker compose up -d
Wait a minute and then use your browser to navigate
to the dashboard at
http://Collector-IP:3000
and login with admin/admin.